
Wind Turbine FAQs
-
- Start with two questions: how much wind your site actually gets, and how much room you have.
- Vertical turbines (the X-300, H1000 and H2000) start turning at 2 to 2.5 m/s and take wind from any direction, so they keep working where the wind swirls and shifts — around buildings, trees and rooflines. They run from 300 W up to 2000 W.
- Horizontal turbines (M-400, M-600, M-800, and the L1, L2 and G series) want cleaner, steadier wind and a clear run at it. In clean, steady wind a horizontal of the same rating is usually the better harvester, and they scale further — 400 W up to 5000 W.
- Match the turbine to your battery bank, not to the biggest number. 12 V suits a camper, 4WD or tinnie; 24 V a van, cabin or boat; 48 V a shed or remote block.
- The largest models run at mains voltage, and the L2-3000, G-3000 and G-5000 are ground-mount only — they need a 10–15 m mast and are not rooftop units.
- Rated power is measured at 10–14 m/s, depending on the model. What you get at your place depends on your wind, your mast height and the season — not on a number on our website.
-
- No. Wind turbines generate "wild" 3-phase AC power that changes voltage constantly with the wind speed.
- Connecting it directly to a battery or a standard solar inverter will destroy your equipment.
- You must wire the turbine into a dedicated wind charge controller (pure-wind or wind-solar hybrid) with a dump-load resistor.
- The controller converts the power to stable DC to charge your batteries safely.
-
Match the turbine and its controller to the voltage of your existing battery bank:
- 12 V: compact mobile setups — caravans, 4WDs and camper trailers.
- 24 V: medium setups — off-grid sheds, cabins and motorhomes.
- 48 V: most of this range, and the sensible choice for a full off-grid system. Higher voltage means less current in the cable, so less loss over a long run and lighter cable.
-
- When your battery bank is fully charged it stops accepting power.
- If a storm hits at night with the batteries full, a turbine with nowhere to send its power will free-spin out of control and can physically fly apart.
- The controller prevents that by diverting the excess into the dump load resistor, which burns it off safely as heat and acts as an electronic brake to slow the turbine down.
- Yes, you need one.
-
- Usually quieter, but not silent — no turbine is.
- Why a Horizontal is Louder: its blade tips travel several times faster than the wind, and blade noise climbs steeply with tip speed. The whoosh rises and falls as each blade comes round — a rhythmic swish that carries through wind noise more than a steady hiss does.
- Why a Vertical is Usually Quieter: its blades turn more slowly, so there is less of that whoosh.
- What we won't Tell you: that it's silent. Every turbine gets louder as the wind picks up. The wind often covers much of it in a strong blow, but a close neighbour can still hear one in light to moderate wind.
- The manufacturer publishes no noise figure for the turbines themselves (the "65 dB or less" on some Specs tabs is the controller's), so we don't quote one.
- On a building, use vibration isolators — a turbine bolted to a structure carries its sound into the rooms — and check your council's rules on noise, height and placement before you order a mast.
-
- It will turn, but turning is not charging. The blades start turning at 2 to 2.5 m/s (about 7 to 9 km/h) — a light breeze.
- Charging starts at the cut-in speed: 3 m/s (about 11 km/h) on every model except the X-300, which starts and charges from 2 m/s. Output then climbs steeply with wind speed.
- The rated figure is measured much higher — 10 to 14 m/s depending on the model, a 36 to 50 km/h wind, not a normal afternoon. Each product page's spec table gives that model's own numbers.
- A gentle breeze keeps the turbine ticking over; it takes real wind to push real power into your batteries. Every horizontal model has its measured power curve published on its product page — work from that, not from the number in the product name.
-
- No — small turbines are built to spin fast. The smaller the rotor, the faster it has to turn to keep its blade tips up with the wind: the M-400's 1.35 m rotor runs at about 800 rpm, the M-600 and M-800 at about 500, the big G-series at 300.
- In the manufacturer's words, the high rpm is a design necessity, not a defect. A slower generator would need a bigger stator and more magnets and copper — heavier and dearer.
- They start turning at 2 to 2.5 m/s and make power right across the wind range — just less when the wind is light. What you get depends on your site and how high you mount it.
-
- Yes — connect the turbine to a battery bank first, through a dedicated charge controller.
- Never straight to an inverter. Connecting a wind turbine directly to a standard inverter will damage the equipment or cause the system to fail.
The Correct Order:
- 1. Wind Turbine — generates wild, fluctuating 3-phase AC as the wind changes.
- 2. Hybrid or Wind Charge Controller — converts it to steady DC, and protects the turbine from over-speeding with an electronic brake.
- 3. Battery Bank (12 V, 24 V or 48 V) — absorbs the gusts and provides a steady source of energy.
- 4. Off-Grid Inverter — connects to the battery, converting stored DC into AC for your appliances.
Why you Cannot Skip the Battery:
- Unstable Voltage: wind changes second by second. Without a battery to smooth it out, a direct-connected inverter would constantly cut out.
- Turbine Damage: when a battery is full or disconnected, the turbine loses its load. Without that resistance the blades can spin out of control in high wind and destroy the unit. The controller uses the battery connection to dump excess power and slow it down.
-
- This turbine generates 3-phase AC power and cannot be connected directly to a battery, a solar controller or a home inverter.
- It must run through a dedicated wind charge controller (pure-wind or wind-solar hybrid) with a dump-load resistor. The dump load stops the turbine over-speeding and destroying itself in high winds once your batteries are full.
- Installation and commissioning must be carried out by a suitably qualified and licensed electrician.
- Cable, breakers, isolators and all protective devices are selected to suit your site and are the electrician's call, not ours.
-
It is almost always one of three installation issues. Check them in order.
Quick Checks — Tick as You Go
- Is the Meter Set to AC Volts (V~)?
- Does it Spin Freely Once Disconnected from the Controller?
- Is the Cable from the Mast Heavy Enough for the Run?
1. The Multimeter is Set to DC — The Most Common Mistake.
- Measuring the three turbine wires with the meter set to DC volts gives a false reading near zero.
- Wind turbines generate 3-phase AC directly from the stator. Switch the meter to AC volts (V~).
2. The Turbine is Stalling Because of a Short.
- The blades turn heavily and slowly, or lock up: if any of the three AC output wires touch each other, or the controller's braking diodes have short-circuited, it acts as a magnetic brake — the turbine can never spin fast enough to build voltage.
- Disconnect the turbine from the controller. If it frees up and spins much faster, the problem is a short in the wiring or a faulty controller.
3. Voltage Drop from Thin Cable.
- Thin solar or automotive cable over 20 metres or more loses the power as heat before it reaches the controller.
- Use heavy cable between the mast and the controller on long runs — minimum 8 AWG, ideally 6 AWG. Final sizing is your electrician's call.
-
- The number in the name is a peak rating, not a promise.
- A turbine's rated output is measured at a specific wind speed — 10 to 14 m/s depending on the model, which is about 36 to 50 km/h — and most sites see far less than that most of the time.
- Your display shows what the wind is delivering right now, so it will sit well below the rated figure and move second by second as the wind changes. That is physics, not a fault.
- As an example, the L2-2500 is rated 2,500 W at 11 m/s. On a decent steady coastal breeze of 7 m/s the manufacturer's own curve gives about 813 W. That is why we publish the full power curve on every horizontal turbine's product page.
- Where these machines earn their keep is time: they keep charging through the night and through the weather that shuts solar down.
- If the display shows 0 W while the blades are spinning, that is a different problem — see the 0 W question.
-
- Not necessarily — this is one of the most common questions we get, and it is rarely a faulty unit.
- It is usually a quick settings check, or (on a first-time install) how the wiring and start-up sequence were done.
- See our full Wind Turbine 0W Troubleshooting Guide for the complete walkthrough, or the Set-Up Guide — or contact us and we will help you sort it out.
-
- Wire your bus bar and breakers before and after the controller, then power up in the right order. Getting the sequence right prevents almost all wiring issues, including the common "spinning but 0 W" problem.
- Fit a breaker before the controller (turbine/solar side) and after it (battery side), landing on a DC bus bar.
- Keep the turbine-to-controller cable run to 2–10 metres to limit voltage drop.
- Power up in this order: battery breaker first, then solar, then wind turbine last.
- See our full How to Install & Start Up guide for the complete step-by-step walkthrough and wiring diagram.


300W Car Power Inverter Adaptor Multifunctional 12/24V
Delivering Outside Australia or New Zealand? Delivery is free. Import duty, customs charges and any tax on arrival are set by your country and are payable by you — we can’t collect them for you.
Tracking
Tracking
Keep an Eye on your Gear
Simply enter the tracking number sent to your email to see exactly where your package is and when it is estimated to arrive.
Note: It may take 24-48 hours for tracking information to update after your order has been dispatched.

300W Car Power Inverter Adaptor Multifunctional 12/24V

Your 12V Socket Runs Out at the Laptop Charger.
You can keep a phone alive off the cigarette lighter all day. The trouble starts the moment something needs a wall plug — a laptop brick, a camera charger, a cordless tool charger, a small compressor. There is nowhere to put it, so it sits flat in the console until you next find town.
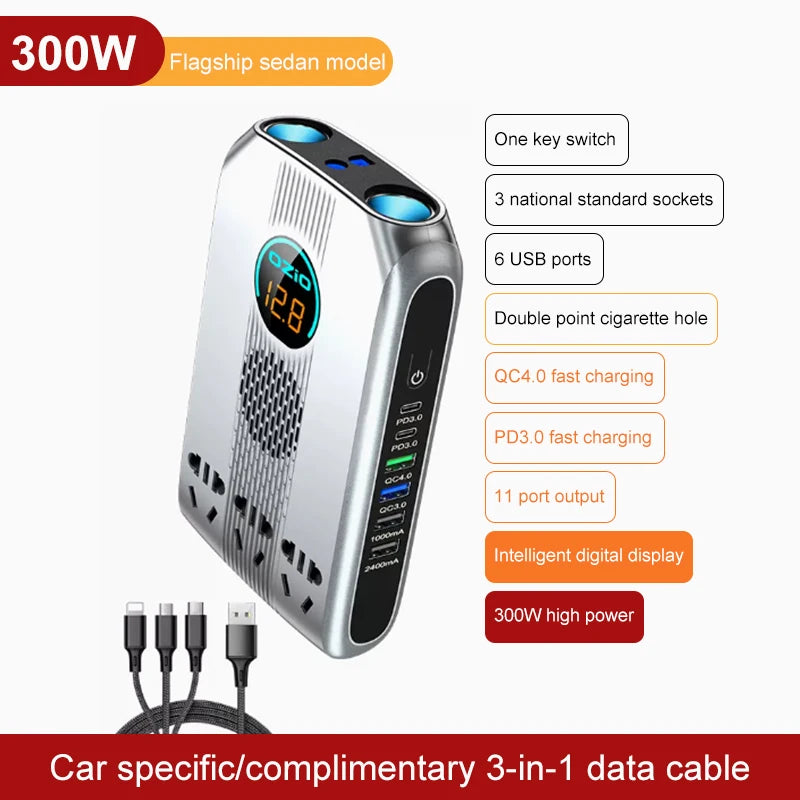
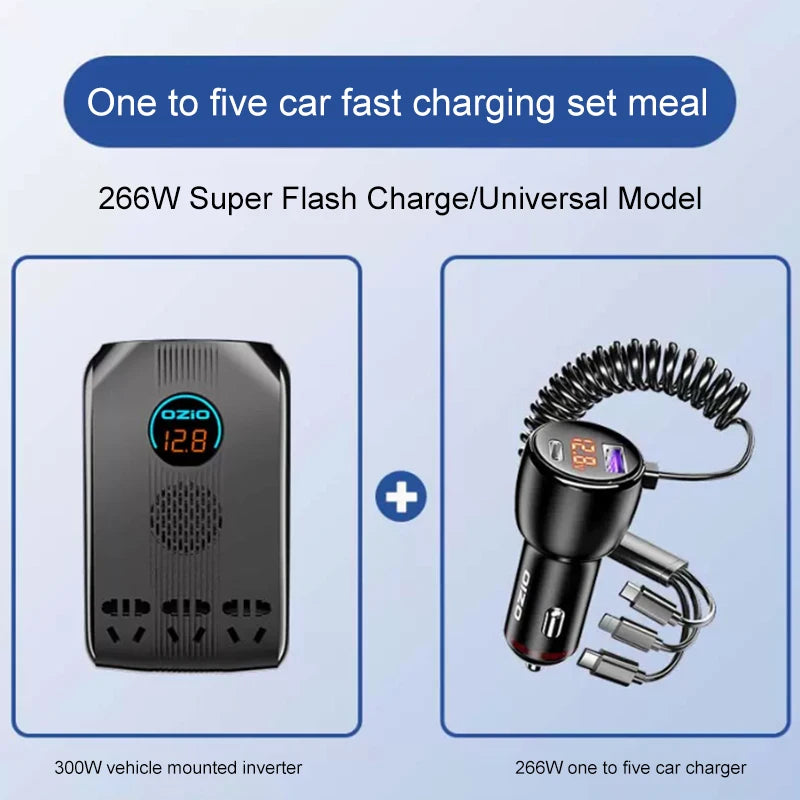
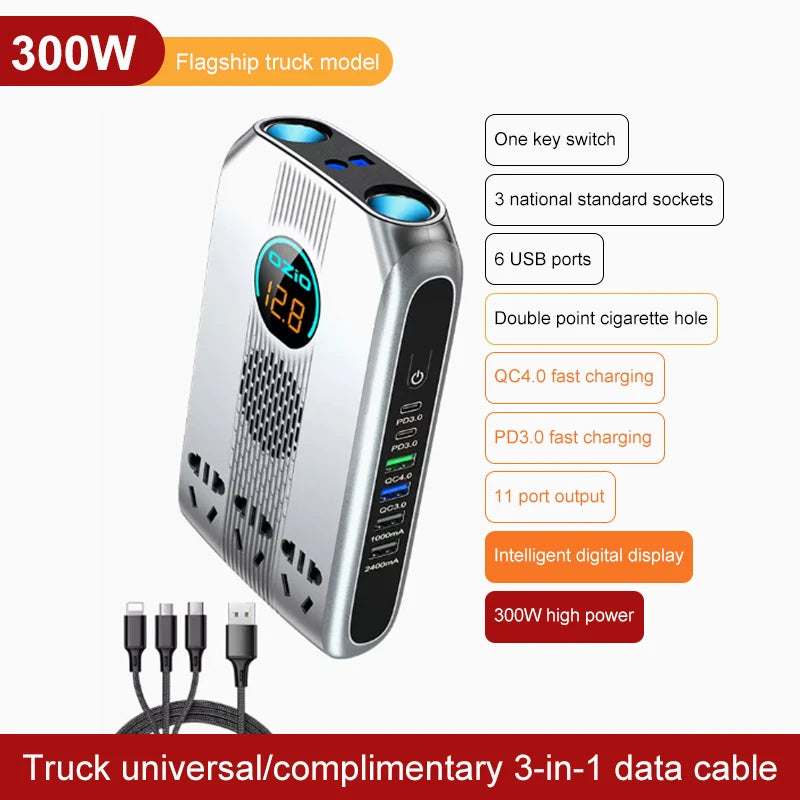
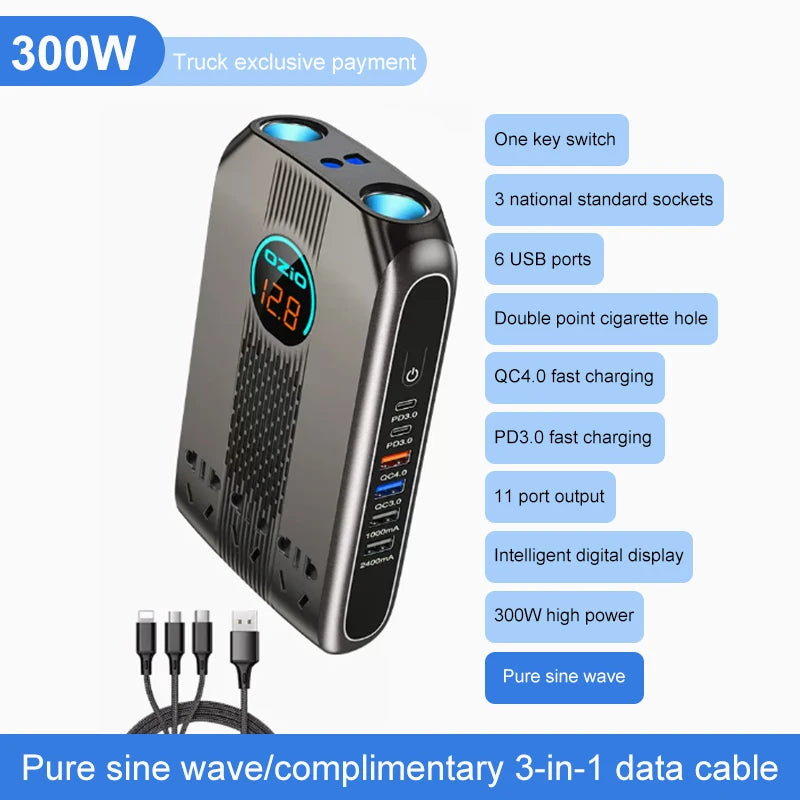
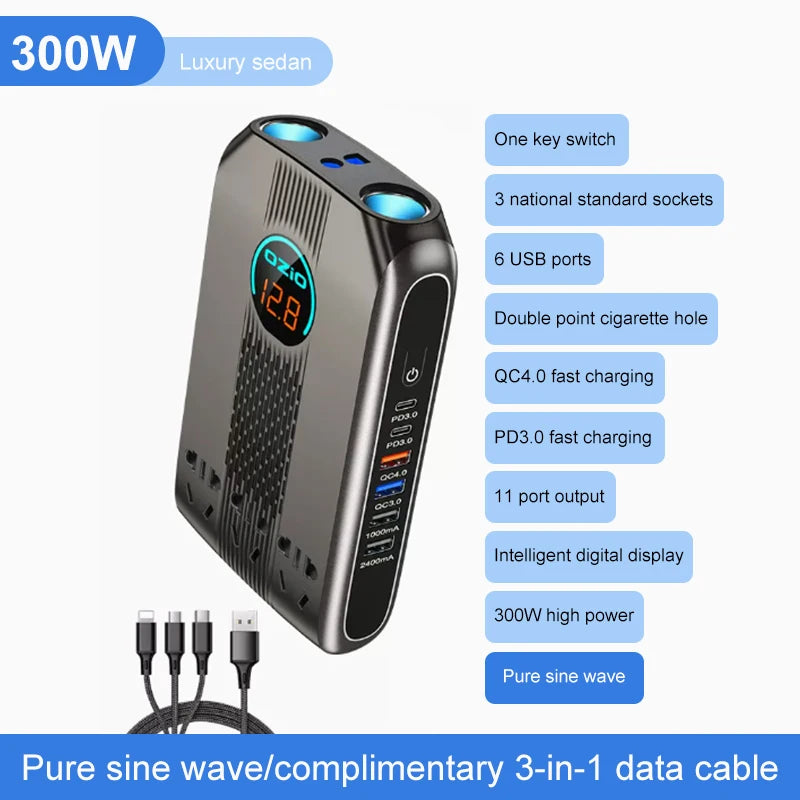
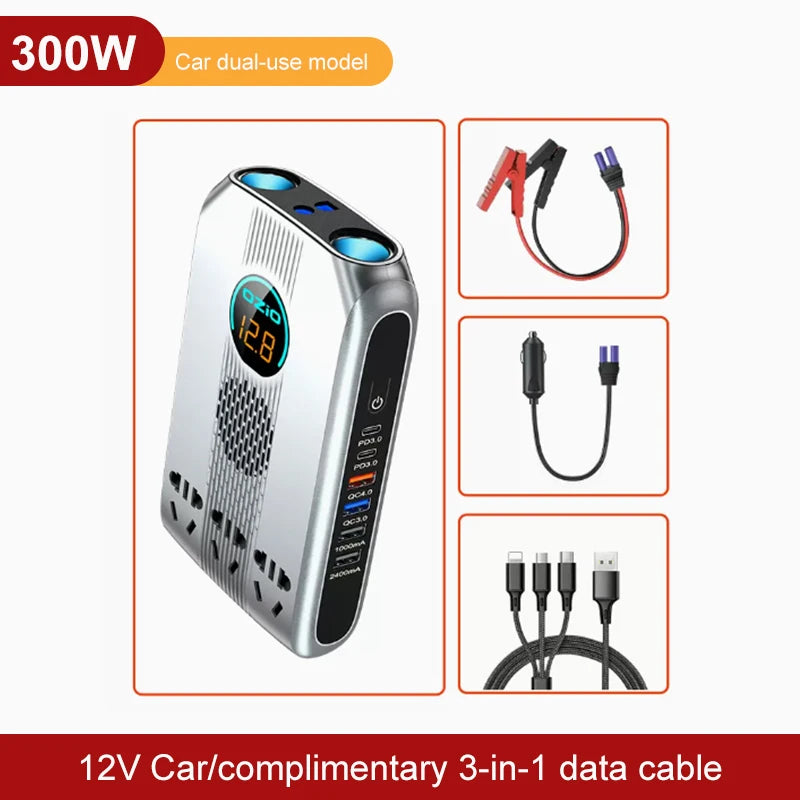
This is a 300 watt inverter that lives in the console and turns the vehicle battery into three mains sockets, six USB ports and two spare cigarette sockets. It runs off the lighter socket, or straight off the battery with the clamp lead on the "With Line" options. There is a voltmeter on the face, so you can watch what the battery is doing before you find out the hard way at 5am.
It is a small inverter and it behaves like one. Three hundred watts covers chargers, laptops, a small fridge or a drone battery. It will not run a kettle, a toaster or anything else with an element in it. And the options in the list are not all the same inverter — the waveform and the input voltage change between them, so read the Limits tab before you pick one. That choice decides what you can safely plug in.
What it Does
- Turns the Battery into Mains: three AC sockets fed from 12 V or 24 V DC, putting out a nominal 220 V at 50 Hz.
- Charges Six Things at Once: two USB-C PD3.0 ports at 20 W each, plus QC4.0, QC3.0, a 2.4 A and a 1 A port.
- Gives the Lighter Socket Back: two more cigarette sockets on the end, 120 W total stated, for a dashcam, a vacuum or a tyre pump.
- Shows the Battery Voltage: an LED readout on the face, so a tired battery is something you see rather than something you discover.
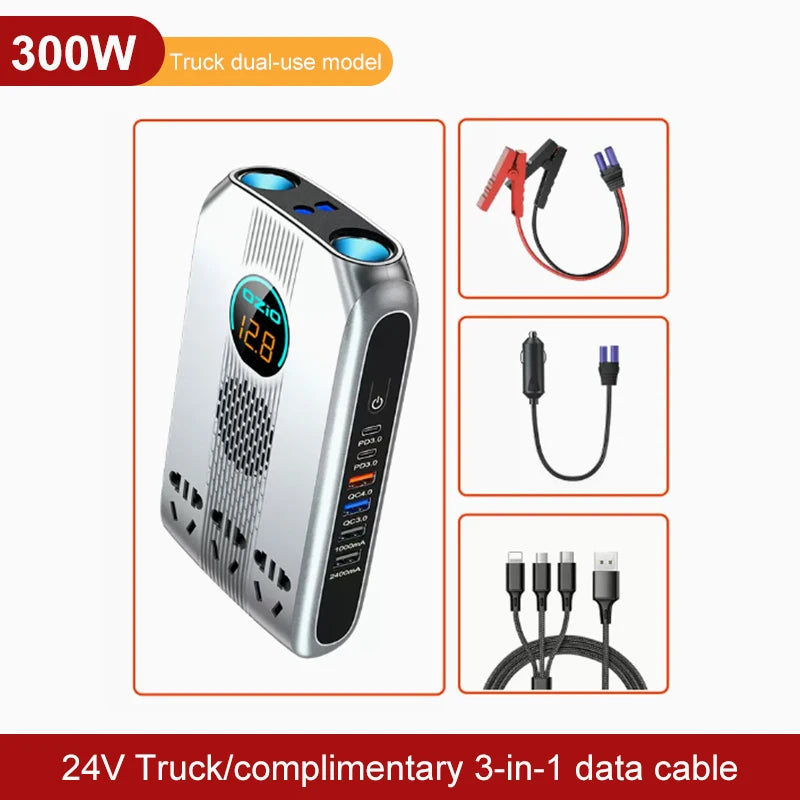
- Feeds Off Clamps or the Lighter: the "With Line" options add a battery clamp lead for drawing more than the lighter circuit will pass.
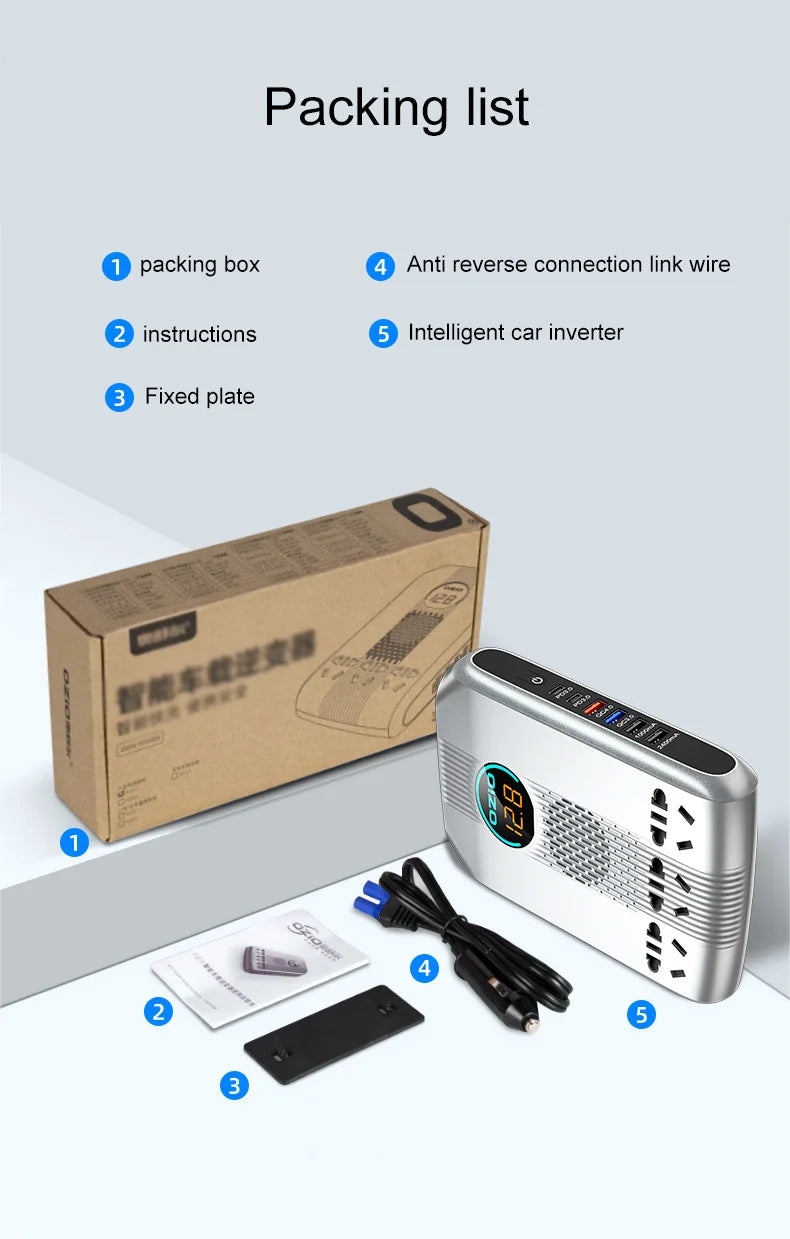
- Stays Where you Put it: a flat fixing plate is in the box so it is not sliding around the footwell.
Key Features
- 300 W Continuous: stated for the K30S1, K31S1 and K30G1. The K20K is stated at 200 W continuous.
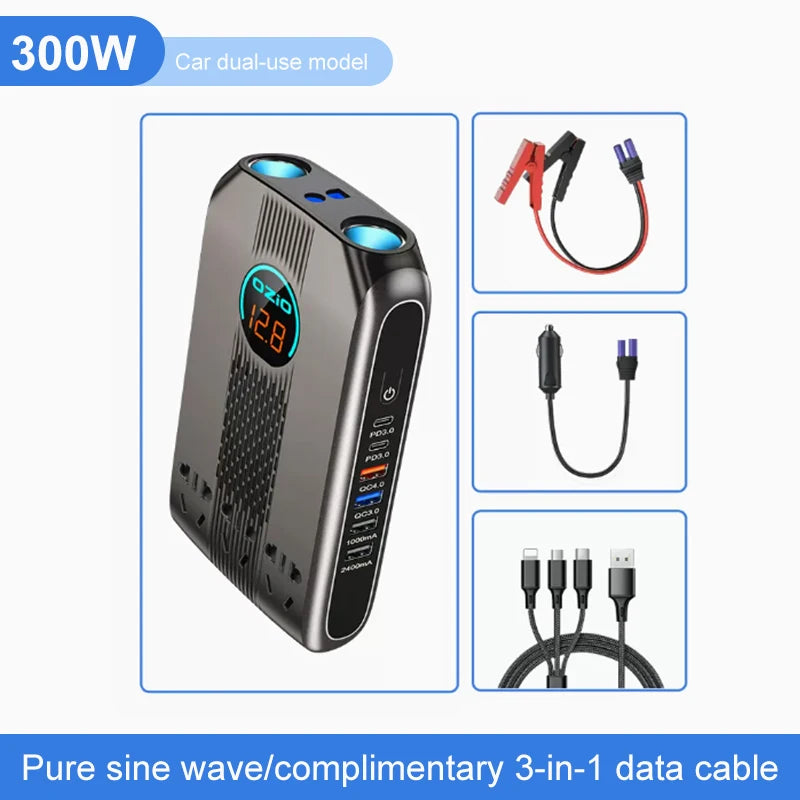
- Waveform Varies by Option: pure sine wave on the K30G1 and K20K, modified sine wave on the K30S1 and K31S1.
- Three Input Arrangements: 12 V only (K30S1, K30G1), 24 V only (K31S1), or 12 V and 24 V (K20K).
- Three AC Sockets: multi-fit pattern with internal safety shutters over the pin holes.
- Six USB Outputs: including two 20 W USB-C PD3.0, so a laptop and a phone can both fast charge without the mains sockets.
- Fan Cooled, Not Passive: a variable-speed internal fan that lifts with temperature.
- Nine Protections Listed: over-temperature, overload, over-current, over-voltage, low-voltage, high-voltage, short circuit, reverse polarity and power outage.
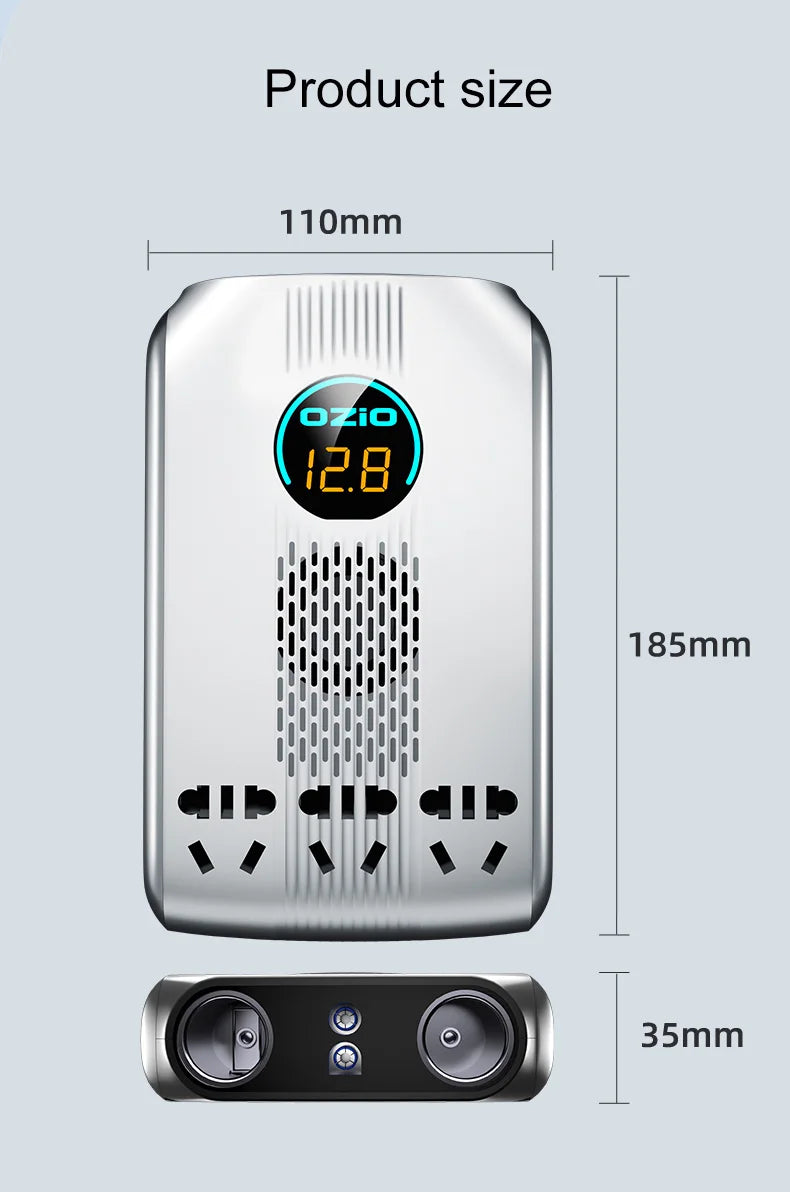
- Console Sized: 185 x 110 x 35 mm and 550 g, so it fits a centre console or a door pocket.
- Flame-Retardant Housing: PC shell, as stated by the supplier.
- Brand Marking: the unit is an OZIO, moulded on the display face. Earlier copy on this page called it a different brand and that was wrong.
- Delivery: Free Standard Delivery, 5 to 10 working days from the day you order. Allow 1–2 days for fulfilment. Regional and remote addresses can take longer.
Limits
Not every option here is a pure sine wave inverter. The supplier's own model-by-model data lists the K30S1 and K31S1 as modified sine wave. Only the K30G1 and the K20K are listed as pure sine wave, and the supplier's own artwork backs that up — the gunmetal units carry a "pure sine wave" callout and the silver ones do not. The page handle and one of the tags on this listing say pure sine wave, and that is only true of some of what is in the dropdown. If you are running a CPAP machine, any other medical device, an induction motor, a mains-powered audio rig or a sensitive charger, pick the K30G1 or the K20K. A modified sine wave can damage that sort of equipment, and it makes some motors and transformers run hot and noisy.
We have not seen a waveform trace for any of them. The split above is the supplier's stated figure, corroborated across its own spec table, its variant artwork and the price gap between the models. Nobody at BushLine has put an oscilloscope on one. Treat "pure sine wave" as the manufacturer's claim, not as a measured result.
The sockets are not Australian sockets. The supplier calls them "national standard" sockets, meaning the Chinese standard, and the photographs show it: the earth hole sits above the two angled pin slots, which is the reverse of an Australian outlet. A standard Australian three-pin plug will not go in the right way up. No travel adaptor is listed as included. Plan on an adaptor, or use the six USB ports and the two cigarette sockets, which take ordinary gear straight off.
It puts out 220 V, not 230 V. Australia and New Zealand run a nominal 230 V. Most gear marked 220–240 V will not care, but anything that genuinely needs 230 V will be running at the bottom of its band.
There is no Australian electrical approval on it. No RCM mark and no Australian approval number appears on the unit, the packaging or any supplied photograph, and no certificate has been sighted. The supplier's marketing images show two framed Chinese certificates; those are not an Australian approval and we are not going to present them as one. This is a mains-voltage device, so that gap is worth knowing about before you decide.
Most of these are not switchable. Only the K20K takes both 12 V and 24 V. The K30S1 and K30G1 are 12 V units, and the K31S1 is a 24 V unit. Putting 24 V into a 12 V model will destroy it. The moulded label on the case reads "DC 12/24V" on every one of them regardless, so the label is no guide — the option you choose in the dropdown is.
300 W is the ceiling and we are not publishing a surge figure. The supplier quotes a peak of 400 W in one place and 600 W in another for the same models, so we have left peak out rather than pick one. Size on the continuous rating. Anything with a heating element — kettle, toaster, jug, hair dryer, heat gun — is well past it. So is most power tool charging above a small pack.
If you want pure sine on 24 V, there is one option. That is the K20K, and it is stated at 200 W continuous rather than 300 W. The 24 V K31S1 is the modified sine wave one. There is no 300 W pure sine 24 V unit in this range.
It is a vehicle accessory, not an installed inverter. It has no hard-wired DC input, no remote, and no transfer switching. If you want something permanently mounted feeding a caravan circuit, this is the wrong shape of tool — look at a fixed inverter instead.
Returns are faulty or not-as-described only. Change of mind is not covered. The factory warranty runs to BushLine and is not transferable, so it is not something a customer can claim against.
Q & A
I Have Got a 24 Volt Truck. Which One do I Order?
The K31S1 if a modified sine wave suits what you are plugging in, or the K20K if you need pure sine wave on 24 V. The K20K is stated at 200 W continuous instead of 300 W, which is the trade. Do not order a K30S1 or a K30G1 for a 24 V system — those are 12 V units and 24 V will destroy them.
Will my Australian Plug Fit the Three Mains Sockets?
Not as it sits. The sockets are the Chinese multi-fit pattern with the earth hole above the angled slots, which is upside down compared with an Australian outlet, and no adaptor is included. A cheap travel adaptor sorts it. The six USB ports and the two cigarette sockets take normal gear with no adaptor at all.
Can I Run a Kettle or a Camp Toaster Off it?
No. Anything with a heating element pulls well over 300 watts and the overload protection will simply shut it down. This is for chargers, laptops, small fridges, camera and drone batteries, a dashcam and similar. If boiling water off the vehicle is the job, you want a 12 V kettle or a bigger fixed inverter, not this.
Is it Safe for a CPAP Machine?
Only on the pure sine wave options, and even then we would say check the requirement your machine's maker states. The K30S1 and K31S1 are modified sine wave and modified sine can damage or upset medical equipment. That is exactly why the model split is spelled out on this page instead of being smoothed over.
Will it Flatten the Battery?
It can, and that is what the voltmeter on the face is for. Idle draw is stated at 0.35 A or less on most models and 0.6 A or less on the K30G1, so it is the load you plug in that does the damage, not the inverter sitting there. Running 300 watts out of a cranking battery with the engine off will get you into trouble in well under an hour. Run the engine, or run it off a second battery.
What does "With Line" Actually Add?
A lead with battery clamps on one end, so you can feed the inverter straight off the terminals instead of through the cigarette lighter circuit. Most lighter circuits are fused around 10 to 15 amps, which is the real limit on how much you can draw. If you plan to use the full 300 watts, the clamp lead is the sensible option.
Specs
| Specifications | Details |
|---|---|
| Brand Marking | OZIO, Moulded on the Display Face |
| Model Codes Stocked | K30S1, K31S1, K30G1, K20K |
| Output Waveform | Pure sine wave stated for K30G1 and K20K; modified sine wave stated for K30S1 and K31S1. No waveform trace sighted |
| Continuous Output | 300 W stated for K30S1, K31S1 and K30G1; 200 W stated for K20K |
| Peak Output | Not published — the supplier states 400 W in one panel and 600 W in another for the same models |
| DC Input, K30S1 & K30G1 | 12 V Nominal, 10.5–15 V DC Operating Range |
| DC Input, K31S1 | 24 V Nominal, 20–30 V DC Operating Range |
| DC Input, K20K | 12 V or 24 V, 10.5–30 V DC Operating Range |
| AC Output | 220 V Nominal, 50 Hz |
| No-Load Current Draw | 0.35 A or less stated (K30S1, K31S1, K20K); 0.6 A or less stated (K30G1) |
| AC Sockets | Three, Chinese multi-fit pattern, internal safety shutters. Not an Australian socket |
| USB Outputs | Six — USB-C PD3.0 20 W x 2, QC4.0, QC3.0, 2.4 A, 1 A |
| Cigarette-Lighter Sockets | Two, 120 W Total Stated |
| Display | LED Voltmeter on the Face |
| Cooling | Variable-Speed Internal Fan |
| Protections Stated | Over-temperature, overload, over-current, over-voltage, low-voltage, high-voltage, short circuit, reverse polarity, power outage |
| Operating Temperature | 0 to 40 °C stated for K30S1, K31S1 and K30G1; –25 to 45 °C stated for K20K |
| Dimensions | 185 x 110 x 35 mm |
| Weight | 550 g |
| Packed Size | 230 x 120 x 50 mm |
| Packed Weight | 0.6 kg |
| Housing | Flame-Retardant PC, Supplier Stated |
| In the Box | Inverter, fixing plate, cigarette-lighter lead, instructions. Battery clamp lead added on the "With Line" options |
| Efficiency | Not Specified by Supplier |
| Low-Voltage Cutoff Threshold | Not Specified by Supplier |
| Total Harmonic Distortion | Not Specified by Supplier |
| Electrical Approval | No RCM mark or Australian approval number sighted on the unit, the packaging or any supplied photograph |
Payment & Security
Payment Methods
Your payment information is processed securely.
We do not store credit card details or have access to your credit card information.
Wind Turbine FAQs
-
- Start with two questions: how much wind your site actually gets, and how much room you have.
- Vertical turbines (the X-300, H1000 and H2000) start turning at 2 to 2.5 m/s and take wind from any direction, so they keep working where the wind swirls and shifts — around buildings, trees and rooflines. They run from 300 W up to 2000 W.
- Horizontal turbines (M-400, M-600, M-800, and the L1, L2 and G series) want cleaner, steadier wind and a clear run at it. In clean, steady wind a horizontal of the same rating is usually the better harvester, and they scale further — 400 W up to 5000 W.
- Match the turbine to your battery bank, not to the biggest number. 12 V suits a camper, 4WD or tinnie; 24 V a van, cabin or boat; 48 V a shed or remote block.
- The largest models run at mains voltage, and the L2-3000, G-3000 and G-5000 are ground-mount only — they need a 10–15 m mast and are not rooftop units.
- Rated power is measured at 10–14 m/s, depending on the model. What you get at your place depends on your wind, your mast height and the season — not on a number on our website.
-
- No. Wind turbines generate "wild" 3-phase AC power that changes voltage constantly with the wind speed.
- Connecting it directly to a battery or a standard solar inverter will destroy your equipment.
- You must wire the turbine into a dedicated wind charge controller (pure-wind or wind-solar hybrid) with a dump-load resistor.
- The controller converts the power to stable DC to charge your batteries safely.
-
Match the turbine and its controller to the voltage of your existing battery bank:
- 12 V: compact mobile setups — caravans, 4WDs and camper trailers.
- 24 V: medium setups — off-grid sheds, cabins and motorhomes.
- 48 V: most of this range, and the sensible choice for a full off-grid system. Higher voltage means less current in the cable, so less loss over a long run and lighter cable.
-
- When your battery bank is fully charged it stops accepting power.
- If a storm hits at night with the batteries full, a turbine with nowhere to send its power will free-spin out of control and can physically fly apart.
- The controller prevents that by diverting the excess into the dump load resistor, which burns it off safely as heat and acts as an electronic brake to slow the turbine down.
- Yes, you need one.
-
- Usually quieter, but not silent — no turbine is.
- Why a Horizontal is Louder: its blade tips travel several times faster than the wind, and blade noise climbs steeply with tip speed. The whoosh rises and falls as each blade comes round — a rhythmic swish that carries through wind noise more than a steady hiss does.
- Why a Vertical is Usually Quieter: its blades turn more slowly, so there is less of that whoosh.
- What we won't Tell you: that it's silent. Every turbine gets louder as the wind picks up. The wind often covers much of it in a strong blow, but a close neighbour can still hear one in light to moderate wind.
- The manufacturer publishes no noise figure for the turbines themselves (the "65 dB or less" on some Specs tabs is the controller's), so we don't quote one.
- On a building, use vibration isolators — a turbine bolted to a structure carries its sound into the rooms — and check your council's rules on noise, height and placement before you order a mast.
-
- It will turn, but turning is not charging. The blades start turning at 2 to 2.5 m/s (about 7 to 9 km/h) — a light breeze.
- Charging starts at the cut-in speed: 3 m/s (about 11 km/h) on every model except the X-300, which starts and charges from 2 m/s. Output then climbs steeply with wind speed.
- The rated figure is measured much higher — 10 to 14 m/s depending on the model, a 36 to 50 km/h wind, not a normal afternoon. Each product page's spec table gives that model's own numbers.
- A gentle breeze keeps the turbine ticking over; it takes real wind to push real power into your batteries. Every horizontal model has its measured power curve published on its product page — work from that, not from the number in the product name.
-
- No — small turbines are built to spin fast. The smaller the rotor, the faster it has to turn to keep its blade tips up with the wind: the M-400's 1.35 m rotor runs at about 800 rpm, the M-600 and M-800 at about 500, the big G-series at 300.
- In the manufacturer's words, the high rpm is a design necessity, not a defect. A slower generator would need a bigger stator and more magnets and copper — heavier and dearer.
- They start turning at 2 to 2.5 m/s and make power right across the wind range — just less when the wind is light. What you get depends on your site and how high you mount it.
-
- Yes — connect the turbine to a battery bank first, through a dedicated charge controller.
- Never straight to an inverter. Connecting a wind turbine directly to a standard inverter will damage the equipment or cause the system to fail.
The Correct Order:
- 1. Wind Turbine — generates wild, fluctuating 3-phase AC as the wind changes.
- 2. Hybrid or Wind Charge Controller — converts it to steady DC, and protects the turbine from over-speeding with an electronic brake.
- 3. Battery Bank (12 V, 24 V or 48 V) — absorbs the gusts and provides a steady source of energy.
- 4. Off-Grid Inverter — connects to the battery, converting stored DC into AC for your appliances.
Why you Cannot Skip the Battery:
- Unstable Voltage: wind changes second by second. Without a battery to smooth it out, a direct-connected inverter would constantly cut out.
- Turbine Damage: when a battery is full or disconnected, the turbine loses its load. Without that resistance the blades can spin out of control in high wind and destroy the unit. The controller uses the battery connection to dump excess power and slow it down.
-
- This turbine generates 3-phase AC power and cannot be connected directly to a battery, a solar controller or a home inverter.
- It must run through a dedicated wind charge controller (pure-wind or wind-solar hybrid) with a dump-load resistor. The dump load stops the turbine over-speeding and destroying itself in high winds once your batteries are full.
- Installation and commissioning must be carried out by a suitably qualified and licensed electrician.
- Cable, breakers, isolators and all protective devices are selected to suit your site and are the electrician's call, not ours.
-
It is almost always one of three installation issues. Check them in order.
Quick Checks — Tick as You Go
- Is the Meter Set to AC Volts (V~)?
- Does it Spin Freely Once Disconnected from the Controller?
- Is the Cable from the Mast Heavy Enough for the Run?
1. The Multimeter is Set to DC — The Most Common Mistake.
- Measuring the three turbine wires with the meter set to DC volts gives a false reading near zero.
- Wind turbines generate 3-phase AC directly from the stator. Switch the meter to AC volts (V~).
2. The Turbine is Stalling Because of a Short.
- The blades turn heavily and slowly, or lock up: if any of the three AC output wires touch each other, or the controller's braking diodes have short-circuited, it acts as a magnetic brake — the turbine can never spin fast enough to build voltage.
- Disconnect the turbine from the controller. If it frees up and spins much faster, the problem is a short in the wiring or a faulty controller.
3. Voltage Drop from Thin Cable.
- Thin solar or automotive cable over 20 metres or more loses the power as heat before it reaches the controller.
- Use heavy cable between the mast and the controller on long runs — minimum 8 AWG, ideally 6 AWG. Final sizing is your electrician's call.
-
- The number in the name is a peak rating, not a promise.
- A turbine's rated output is measured at a specific wind speed — 10 to 14 m/s depending on the model, which is about 36 to 50 km/h — and most sites see far less than that most of the time.
- Your display shows what the wind is delivering right now, so it will sit well below the rated figure and move second by second as the wind changes. That is physics, not a fault.
- As an example, the L2-2500 is rated 2,500 W at 11 m/s. On a decent steady coastal breeze of 7 m/s the manufacturer's own curve gives about 813 W. That is why we publish the full power curve on every horizontal turbine's product page.
- Where these machines earn their keep is time: they keep charging through the night and through the weather that shuts solar down.
- If the display shows 0 W while the blades are spinning, that is a different problem — see the 0 W question.
-
- Not necessarily — this is one of the most common questions we get, and it is rarely a faulty unit.
- It is usually a quick settings check, or (on a first-time install) how the wiring and start-up sequence were done.
- See our full Wind Turbine 0W Troubleshooting Guide for the complete walkthrough, or the Set-Up Guide — or contact us and we will help you sort it out.
-
- Wire your bus bar and breakers before and after the controller, then power up in the right order. Getting the sequence right prevents almost all wiring issues, including the common "spinning but 0 W" problem.
- Fit a breaker before the controller (turbine/solar side) and after it (battery side), landing on a DC bus bar.
- Keep the turbine-to-controller cable run to 2–10 metres to limit voltage drop.
- Power up in this order: battery breaker first, then solar, then wind turbine last.
- See our full How to Install & Start Up guide for the complete step-by-step walkthrough and wiring diagram.
